What is Labex Inspiration?

Labex Inspiration က CLASS I medical device တစ်ခုဖြစ်ပါတယ် ။ သူကအဓိက ကတော့ Low frequency ဖြစ်တဲ့ 60 to 195 Hz အတွင်းကို Mechanical vibrations အနေနဲ့ ထုတ်ပေးပါတယ် ။ Touch slider နဲ့ အသုံးပြုရတာဖြစ်ပြီး စကားပြောနေတဲ့ အချိန်အတွင်းမှာတင် Tone ကိုပြောင်းလဲလို့ရပါတယ်။ Vibrations နဲ့ လည်ပင်းက Oral articulation ( muscles) ပေါင်းစပ်ပြီး Comprehensible speech ကို ဖန်တီးလို့ရပါတယ်။
In the box
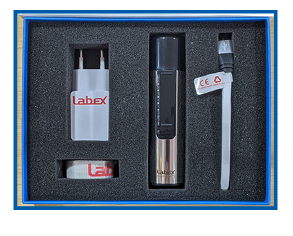
Box ထဲမှာတော့ Labex Inspiration Electrolarynx ၊ USB charging Cable ၊ Intelligent USB charger 5V 2A ၊ Labex lanyard ၊ User Manual ၊ Warranty Card တွေပါ ပါတယ်။

ပါဝင်ပစ္စည်းများ
- Labex Inspiration Electrolarynx
- USB charging Cable
- Intelligent USB charger 5V 2A
- Labex lanyard
- User Manual
- Warranty Card
Parts and buttons
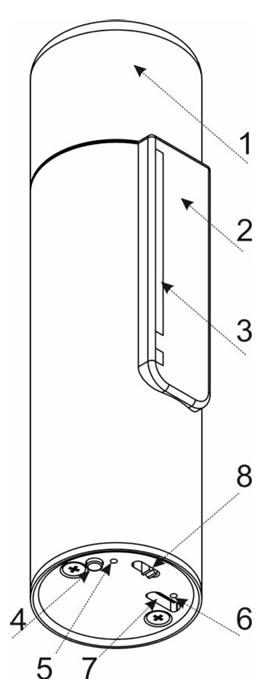
- Top Cap
- Touch Slider
- LED Bar
- Settings Button (FB)
- Red LED
- Green LED
- USB Port
- ON / OFF Switch

How to use Labex Inspiration
အရင်ဦးဆုံး Labex က battery ကို တစ်ဝက်လောက်ပဲ သွင်းပေးထားပါတယ်။ အဲ့တာကြောင့် Battery ကို အားအပြည့် အရင်သွင်းရပါမယ်။ အားပြည့်သွားပြီဆိုမှ စသုံးသင့်ပါတယ်။
အားဘယ်လိုသွင်းရမလဲဆိုရင် သူ့ထဲမှာပါတဲ့ Labex intelligent charger နဲ့ သွင်းရပါမယ်။ Plug ထိုးအာလုံး ချိတ်စပ်ပြီးသွားပြီဆိုရင် Micro USB ထည့်တဲ့ အပေါက်ဘေးနားမှာ Green LED နဲ့ Red LED တစ်ပြိုင်နက်တည်းပေါ်လာပါလိမ့်မယ်။ Green LED ပေါ်လာရခြင်းက Charger နဲ့ တွဲစပ်တာမှန်ကန်မှုရှိတယ်လို့ဆိုလိုပြီး Red LED က တော့ Charging သွင်းနေတယ် အားမပြည့်သေးဘူး လို့ ဆိုလိုပါတယ်။
Battery အားပြည့်သွားမယ်ဆိုရင် Red LEDက ပိတ်သွားပါလိမ့်မယ် ။
Note: အားသွင်းနေတုန်းမှာဆိုရင်တော့ အသုံးပြုလို့မရပါ။
ဒါဆို Charging ပြည့်သွားပြီဆိုရင် စက်ကို ဖွင့်ဖို့ on/off ခလုတ်မှာ On ကို လုပ်ပါ။ အသံတိုလေးတစ်ခု ထွက်လာပါလိမ့်မယ်။ အဲ့လိုထွက်လာခြင်းက Device အတွင်းမှာရှိတဲ့ Internal Mechanical System အလုပ်ကောင်းကောင်းလုပ်နေတယ်လို့ ဆိုလိုပါတယ်။ LED အလင်းက Battery အားဘယ်လောက်ရှိလဲဆိုတာကိုလည်း ပြပါတယ်။ Pitch of the soundကို Touch panel နဲ့အတိုးအလျှေ့ာလုပ်ပြီး လိုသလိုချိန်ညှိနိုင်ပါတယ်။
ဒါဆိုရင် စကားပြောသံကြားရဖို့ ဆိုရင် Electrolarynx ကို ဖိပြီး ကိုယ့်ရဲ့ လည်မျိုဘယ်နားမှာထားရင် အဆင်ပြေလဲဆိုတာ ရှာရပါမယ်။ တစ်ယောက်နဲ့တစ်ယောက်မတူတဲ့အတွက် ကိုယ့် ရဲ့အကောင်းဆုံး Sweet spot ကို ရှာဖွေရပါမယ်။
အသံကောင်းကောင်းနဲ့ စကားပြောနိုင်ဖို့ (၃) ရက်ကနေ (၁) လလောက်ထိ ကျင့်ယူရနိုင်ပါတယ်။ ကိုယ့်ရဲ့အကောင်းဆုံးနေရာကို ရှာဖွေရာမှာ တတ်သိနားလည်တဲ့ ပညာရှင်တွေနဲ့ ဆွေးနွေးရင်ပိုကောင်းပါတယ်။
Note: Device ကို Switch on လုပ်နေတဲ့အချိန်မှာ Touch Bar ကို လက်နှင့်သွားထိတာမျိုးမလုပ်ရပါဘူး။
Using The Inspiration
Labex Inspiration မှာ Modes တွေ အများကြီးရှိပါတယ်။ Daily Usage အနေနဲ့တော့ 3 functions လောက်ဆို အဆင်ပြေပါတယ်။
(1) Speak & change the pitch while talking
Touch Panel ကို အသုံးပြုပြီး အသံထွက်အောင်လုပ်လို့ရပါတယ်။ အသံရပ်ချင်တယ်ဆိုရင် Touch ကို လွှတ်လိုက်ပါ။ အသံအတိုးအချဲ့ကိုလည်း Touch နဲ့ လုပ်လို့ရပါတယ်။
(2) Quickly raise or lower the volume level
အရင်ဆုံး Touch Panel ကို လက်နှင့်ထိထားပါ။ အသံထွက်လာပါလိမ့်မယ်။ အသံကို မှတ်ထားပါ။ ပြီးရင် Touch Panel ကိုထိထားတာကို မလွှတ်ဘဲ Settings Button ကို ဖိနှိပ်ထားလိုက်ပါ။ အဲ့တာဆိုရင် Volume အတိုးအကျယ်လုပ်လို့ရပါပြီ။ Volume တိုးချင်ရင် Touch ကိုအောက်ဆွဲချပြီး Volume ကျယ်ချင်ရင် Touch ကို အပေါ်တွန်းတင်လိုက်ပါ။ ကိုယ်လိုချင်တဲ့ Volume ကိုရောက်ပြီဆိုရင် Settings Button ကို လွှတ်လိုက်ပါ။ ဒါဆို Confirm ဖြစ်ပြီး Device က Auto save ဖြစ်သွားပါပြီ။
(3) Check the battery discharge level and the current intonation mode
Setting button ကို အကြာကြီး ဖိနှပ်ထားလိုက်တာပါ။ LED bar မှာ all LEDs က လင်းလာပါလိမ့်မယ်။ အဲ့တာဆိုရင် Battery က အပြည့်နီးပါးပါ။ အကယ်၍ LED ၁ လုံး ၂ လုံးပဲ လင်းတယ်ဆိုရင် Battery ကို Charging သွင်းဖို့လိုအပ်နေပါပြီ။
Settings button ကို မလွှတ်ဘဲ ဆက်ပြီး ဖိထားမယ်ဆိုရင် LED bar မှာရှိတဲ့ all LEDs တွေ ပိတ်သွားပြီး LED ၁ လုံးပဲ လင်းလာပါလိမ့်မယ်။ အဲ့တာက ဘာကိုပြနေလဲဆိုရင် ကိုယ့်ရဲ့ Current Intonation mode ဘယ်လောက်လဲဆိုတာကို ပြတာပါ။
List of all 8 modes of operation
ပုံမှန် User တစ်ယောက်အနေနဲ့ဆိုရင်တော့ အပေါ်က Functions ၃ ခုလောက်သိရင်အဆင်ပြေပါပြီ။ သို့ပေမဲ့ User ရဲ့ ကြိုက်နှစ်သက်မှုအရ ပြောင်းချင်တယ်ဆိုရင် Speech therapist နဲ့တိုင်ပင်ပြီး Mode 8 ခုထဲမှာ ပြောင်းလဲလို့ရပါတယ်။
(1) Standard Intonation Mode
ကိုယ့်ရဲ့လက်က ဘယ်နေရာက စပြီး Touch bar ကိုထိထိ Base pitch က နေပဲစတယ်။
(2) Linear Intonation Mode
ကိုယ့်ရဲ့လက်က Touch panel ကို ထိတဲ့ပုံစံပေါ်မူတည်ပြီးကွာပါတယ်။ LED bar ရဲ့ အပေါ် ဘက်ကို စထိရင် High pitch ကနေ စပြီး အောက်ဘက်ကနေ စထိရင် Low pitch ကနေ စပါတယ်။
(3) Volume Mode
Volume Mode ကတော့ အပေါ်မှာပြောထားတဲ့အတိုင်းvolume up and down လုပ်လို့ရပါတယ်။ Pitch ကတော့ unchanged and flat ဖြစ်ပြီး Basic pitch နဲ့တူတူပါပဲ။
(4) East Asian Modulation
ဒီ Mode က အဓိက East Asian Languages တွေအတွက် လုပ်ထားတာပါ။
(5) Musical Notes Mode
(6) Automatic Start/ Stop Source Switch
(7) Factory Reset
(8) Base Pitch Select
How to enter and switch between the modes
အရင်ဦးဆုံး Device ကို on/ off ခလုတ်နဲ့ Off လုပ်ထားရပါမယ်။ ပြီးရင် Settings button ကို အကြာကြီးဖိနှိပ်ထားလိုက်ပါ။ ဖိနှိပ်နေတုန်းမှာပဲ Deviceကို on/off ခလုတ်နဲ့ On လိုက်ပါ။ အဲ့တာဆိုရင် LED bar အောက်ခြေမှာရှိတဲ့ LED စလင်းလာပါလိမ့်မယ် ။ ပြီးတော့အပေါ်က first LED လင်းလာပါမယ်။ 3 secondsခြားစီ LED မီးလုံးလေးတွေ လင်းလာပါလိမ့်မယ်။ Mode က ၈ ခုပါတဲ့အတွက်ကြောင့် ၈ ခုမြောက် LED မီးထိလင်းပြီဆို Mode ကုန်သွားပါပြီ။ ဒါဆိုရင် ကိုယ်လိုချင်တဲ့ Mode ရောက်ရင် settings button ကို လွှတ်လိုက်ပါ။ settings button လွှတ်လိုက်တဲ့ နေရာရဲ့ LED မီးနဲ့ ဆိုင်တဲ့ mode ထဲကို တန်းဝင်သွားပါတယ်။ ဝင်သွားတာနဲ့ Short and quiet sound device ကနေ ထွက်လာပါလိမ့်မယ်။
ဥပမာ Mode 3ကိုသွားချင်တယ်ဆိုရင် Settings buttonကို ဖိနှပ်ထား၊ On buttonနဲ့ ဖွင့် LED 3 ခု မြောက်ထိ လင်းလာတာကိုစောင့်၊ ရောက်ပြီဆို settings buttonကို လွှတ် ၊ ဒါဆို Mode 3 Volume mode ထဲကို ဝင်သွားပါပြီ။ Touch panel နဲ့ လိုသလိုအတိုးအလျော့လုပ် လို့ရပါပြီ။
Battery
Battery level ဘယ်လောက်ရှိလဲ သိချင်ရင် Device ကို on ၊ settings buttonကို ဖိနှပ်ထားလိုက်ရင် 2 seconds လောက်ကြာရင် LED bar မှာပေါ်လာပါလိမ့်မယ်။ 8 LEDs လုံး ပေါ်နေတယ်ဆိုရင် Fully charge ၊1 or 2 LEDs ပဲပေါ်နေပြီဆိုရင် Need to charge ။
Note: အကယ်၍ batteryက 1 LEDအောက်ရောက်နေပြီဆိုရင် deviceက auto soundထုတ်တာ ရပ်သွားပါလိမ့်မယ်။ ပြီးတော့ Touch panelကို သွားထိတိုင်းလည်း LED bar ရဲ့ Button မှာ Red LED ပြနေပါလိမ့်မယ်။ အဲ့တာဆိုရင် Charging သွင်းဖို့လိုအပ်ပါပြီ။ အားအပြည့်သွင်းထားပြီး 1 hour အောက်ပဲခံတယ်ဆိုရင် သူ့ရဲ့ end of the battery life cycle ကို ရောက်ရှိနေပါပြီ။
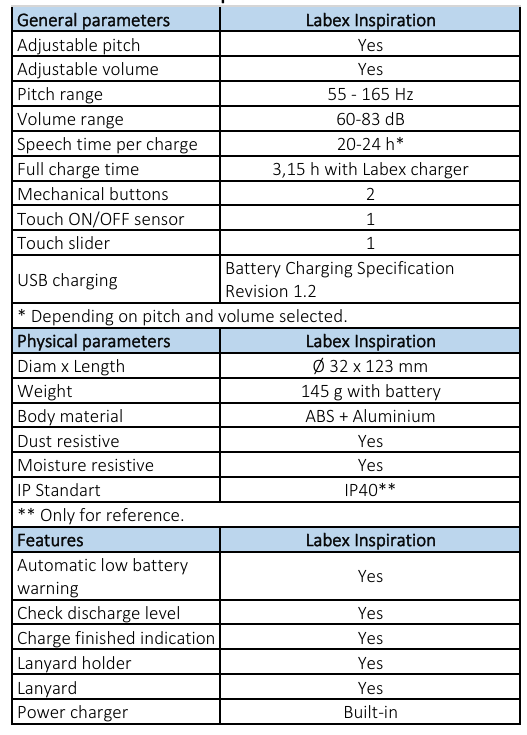
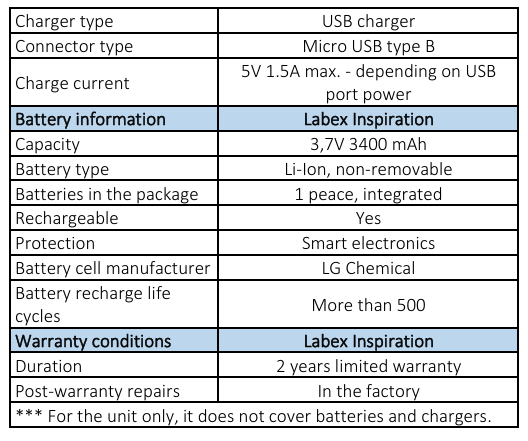
Specifications


